GitOps with R and K8s Part 2: Continuous Integration
PreReqs: R, Rmarkdown, a Github account, and a Docker Hub account
Let’s first turn to getting your website created and containerized. If you’re not familiar with git or Docker, this might be a lot to take in, but there are plenty of resources out there a short search away.
Continuous Integration
git
I use Github and the Rstudio IDE to create and manage my repos. To do this, first create the repo on Github, then clone it into a New Project in Rstudio. Of course, you can use any git repo or editor your heart desires. I called my project Tocayo. So my present working directory (pwd) is ~/Tocayo. Tocayo is a Mexican Spanish term for having the same first name… as my blog does with me.
blogdown
Second, get familiar with blogdown via the 1st chapter of the blogdown book; i.e. install blogdown, create a blogdown website, and push it to github. I recommend doing the simple example first before getting crazy with themes. That was quite the excursion for me.
Note: If you are using another theme, then you’ll need to take the js file in the default theme and put it into your chosen theme. That’s where the Rmarkdown -> Markdown magic happens.
Additionally, it’s at the point where you need to add all the files in the Tocayo folder that the Rstudio git gui starts to hang. It’s easier to just go to the command line. For those of you like me, who don’t use the command line very often, the commands are:
git add -A
git commit -m "New Version"
git tag "v20.06.15" master
git push -u origin "v20.06.15"
git push -u origin master
If you’re not used to tagging your git commits/pushes, you’ll soon see why we’re doing that.
Docker
Next we want to containerize your website. To do this we’ll use an Nginx webserver container. At this point you should have a working directory with a sub-directory public where Hugo compiled your website; e.g. ~/Tocayo/public/. To build your website container create a Dockerfile in your working directory (e.g. ~/Tocayo/Dockerfile) with the following:
FROM nginx:alpine
COPY ./public /usr/share/nginx/html
This Dockerfile uses an nginx container as a base and copies your website from the public subfolder into the appropriate folder in the container; i.e. /usr/share/nginx/html. If you understand the Linux command line, then understanding what is in a Dockerfile should be fairly straightforward. Keep in mind that there are existing Shiny Server and Plumber containers for your app and API needs. Deploying and integrating these other standard R tools with this blogdown website will be the topic of future posts.
Now we build and push that container. Obviously, you’ll want to replace my Docker Hub username with yours:
docker login --username=troyhernandez
docker images
docker build -t troyhernandez/tocayo:sd-20.06.15 .
docker push troyhernandez/tocayo:sd-20.06.15
If you’re curious or unsure if it worked, then I suggest you docker run your new image before pushing it. There is more info here for that.
Integration
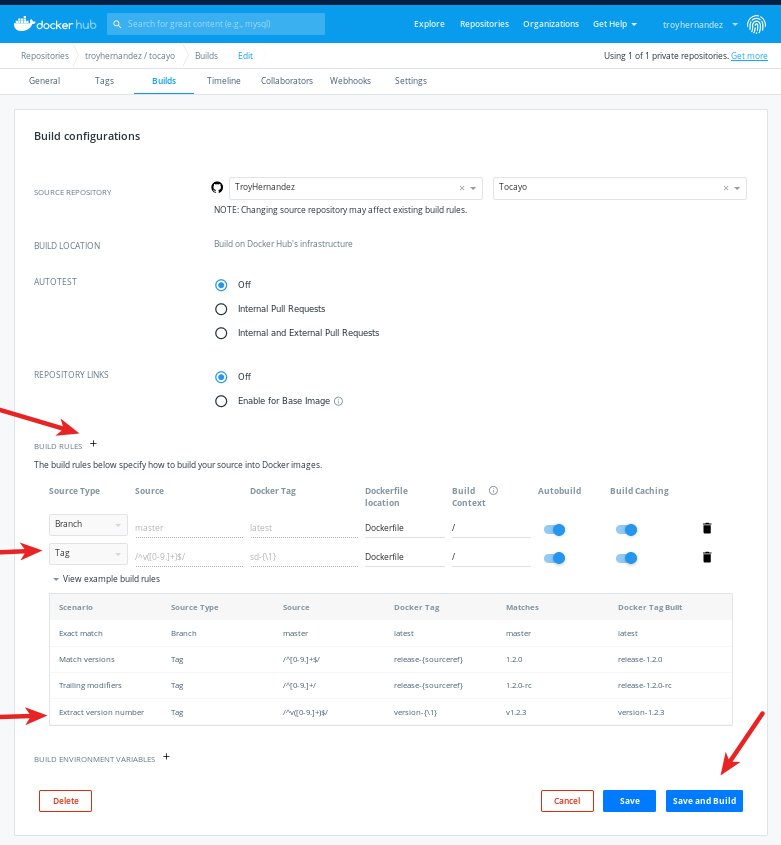
To achieve continuous integration we need one more step: Link your Docker Hub to your Github. Go to the repo you just created, click Manage Repository button, then go to build, click on Link to Github, and follow the above instructions.
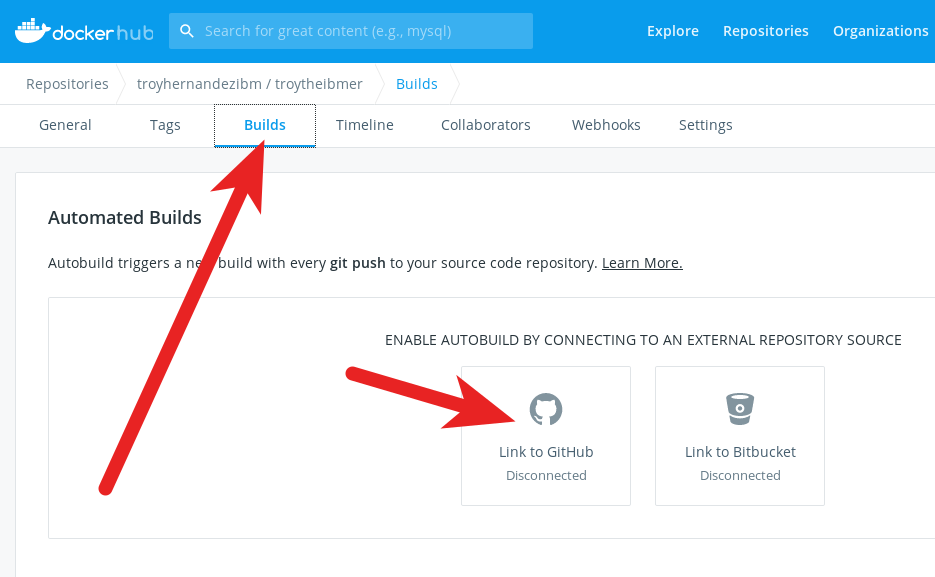
Not covered in the above instructions is configuring the Build Rules. For more info on this process, this is a good resource.
Now every time you:
git add -A
git commit -m "New Version"
git tag "v20.06.16" master
git push -u origin "v20.06.16"
git push -u origin master
Docker Hub will rebuild the image (i.e. your website) and tag it appropriately. This is important for the next step; the CD. Otherwise, we’re done with the CI!
Keep going to part 3 to see how to deploy your blogdown site via k8s! Or back to part 1 to review.