GitOps with R and K8s Part 3: Continuous Delivery
PreReqs: An IBM Cloud account
Welcome back. At this point you should have a blogdown page in a container, hosted on Docker Hub, continuously integrated with your Github. Now we move on to…
Continuous Delivery
We need to get that container published and hosted on a k8s cluster. First we’ll stand up a managed k8s cluster. Then we’ll install Argo CD on that cluster and set up Argo to automate the process of using your new website/container whenever you push to git… that’s continuous delivery (CD)! If you don’t know about CI/CD, click here or research it yourself. It’s too big of a topic to cover in this post, but I hope you’ve got the gist.
K8s
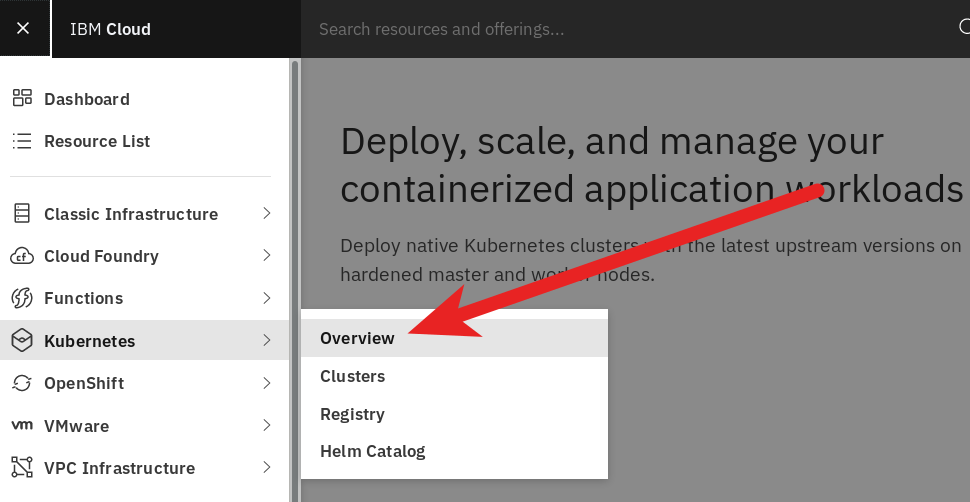
Let’s go to the IBM Cloud, click on the hamburger button, kubernetes, and clusters:

To create a cluster click the big blue “Create a cluster +” button. There’s an option for a small free cluster (it goes away after 30 days). The smallest paid cluster currently costs $86/mo.
For a cheaper solution, you can rent vanilla Linux machines, and install k8s yourself. That’s a lot of work. The cheapest solution would be to rent a single VM and run micro.k8s, oc cluster up, or use Code Ready Containers on it. This minimizes the networking that you’d otherwise have to do in an unmanaged multi-machine cluster. That makes things easier and still allows you to not get a fixed IP address at home for your blog. That would run from $25 to $40 dollars… I haven’t tried it yet. I’m okay with $86/mo… for now :)
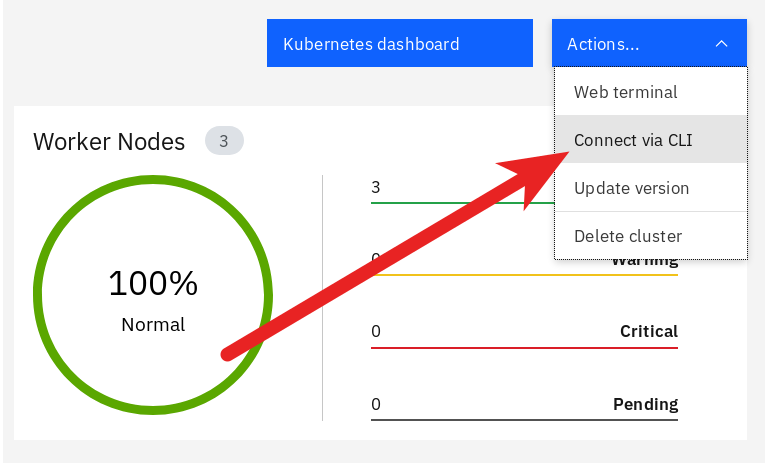
Once your cluster gets provisioned you’ll want to connect via the CLI… The process varies if you’re working on Windows or *NIX.

ibmcloud login -a cloud.ibm.com -r us-south -g default
ibmcloud ks cluster config --cluster XXXXXXXXXXXXXXXXXXXXXXXXXXXX
kubectl config current-context
Argo CD
We’re going to install Argo CD on our cluster. As I’m using Linux, I can easily follow the official getting started instructions.
Some notes again for working on the IBM Cloud. To visit the page where Argo CD is running, run a few commands to find the IP address. First list your clusters. Then get that cluster’s worker’s public IP address. Then get the port.
# Use this command to get the clusterID
ibmcloud ks cluster ls
# Use this command to determine the Public IP Address
ibmcloud ks workers --cluster <clusterIDhere>
# Use this command to determine the port number
kubectl get services -n argocd -l app.kubernetes.io/name=argocd-server | cut -d':' -f 3 | cut -d'/' -f 1
That should give you an address to vist; something like xxx.xxx.xxx.xx:portnumber. Finally, to get into the Argo CD Service, username is admin, password is the pod name of the argo-server container. To get that pod name, use kubectl get pods -n argocd -l app.kubernetes.io/name=argocd-server -o name | cut -d'/' -f 2. Login to your remote argo using this:
argocd login xxx.xxx.xxx.xx:portnumber
# username: admin
# password: argocd-server-xxxxxxxxxxxxxxxx
At this point I (and Argo’s docs repeatedly) suggest creating a new repo for your GitOps. I called mine, GitOps. In your ~/GitOps folder, you’ll want a subfolder for each app/website you’re deploying; e.g. ~/GitOps/tocayo. In that repo you’ll need two yaml files. yaml has got what k8s craves. This topic can be overwhelming at first, but luckily, deploying an nginx container to k8s is literally the first example in the docs. Following that example, our first yaml file will describe the deployment of the Blogdown/nginx container(s). Call it ~/GitOps/tocayo/tocayo.yaml:
apiVersion: apps/v1
kind: Deployment
metadata:
  name: tocayo-deployment
spec:
  replicas: 3
  selector:
    matchLabels:
      app: tocayo
  template:
    metadata:
      labels:
        app: tocayo
    spec:
      containers:
      - name: tocayo
        image: troyhernandez/tocayo:sd-20.06.15
This is a lot of text, but the important parts are:
kind: Deployment, “You can run an application by creating a Kubernetes Deployment object”replicas: 3, this will deploy 3 identical pods/copies of your containerimage: troyhernandez/tocayo:sd-20.06.15, this is the image pulled/used from my Docker Hub
If your image is private as mine is, then you’ll need to do two things to give your cluster access to your registry. First, give your credentials to your k8s cluster via a secret:
kubectl create secret docker-registry regcred --docker-server=https://index.docker.io/v1/ --docker-username=troyhernandez --docker-email=troy.hernandez@ibm.com --docker-password=xyzThen you’ll need to let k8s know that pulling this image requires a secret. You do that by adding two lines to your ~/GitOps/tocayo/tocayo.yaml:
apiVersion: apps/v1
kind: Deployment
metadata:
  name: tocayo-deployment
spec:
  replicas: 3
  selector:
    matchLabels:
      app: tocayo
  template:
    metadata:
      labels:
        app: tocayo
    spec:
      containers:
      - name: tocayo
        image: troyhernandez/tocayo:sd-20.06.15
      imagePullSecrets:
      - name: regcred
Some docs for k8s secrets are here.
The second yaml file you need is a service. I called it ~/GitOps/tocayo/tocayo-nodeport.yaml. This service will expose your blogdown/nginx pods to the internet so that people can visit your website! This info is a little further into the documentation here:
So we have pods running nginx in a flat, cluster wide, address space. In theory, you could talk to these pods directly, but what happens when a node dies? The pods die with it, and the Deployment will create new ones, with different IPs. This is the problem a Service solves.
apiVersion: v1
kind: Service
metadata:
  name: tocayo-service
spec:
  ports:
  - port: 80
    protocol: TCP
  type: NodePort
  selector:
    app: tocayo
If you’ve made your git repo private, you’ll need these instructions:
argocd repo add https://github.com/TroyHernandez/GitOps --username TroyHernandez --password <password>To finally deploy your app, run this as per steps 6 and 7 in the Argo CD “Getting started” docs:
argocd app create tocayo --repo https://github.com/troyhernandez/GitOps.git --path tocayo --dest-server https://kubernetes.default.svc --dest-namespace default --sync-policy automated --self-heal --auto-prune
argocd app sync tocayo
Voilà. In a few seconds you should have your website deployed! Moreover, the flags --sync-policy automated, --self-heal, and --auto-prune will keep your cluster’s containers up to date with whatever is on Docker Hub as long as you put the correct version number in your tocayo.yaml and push it to Github.
To access that deployment you’ll need to know your cluster’s public IP address and the port on which the blogdown/nginx container is exposed. The first command will show you your cluster(s) ID. You’ll use that to find the worker’s Public IP in the second command. The last command will tell you the port where the blogdown/nginx containers are exposed.
ibmcloud ks cluster ls
ibmcloud ks workers --cluster <clusterID>
kubectl get services | cut -d':' -f 2 | cut -d'/' -f 1
You can then visit your website at <Public IP>:PORT.
A New Process
Let’s try the whole kit and caboodle.
- Make a change to your website
- Let Hugo recompile
- git commit, tag it (e.g.
v20.06.16), and push it - Change the container image in
~/GitOps/tocayo/tocayo.yamlto the current version; e.g. fromimage: troyhernandez/tocayo:sd-20.06.15toimage: troyhernandez/tocayo:sd-20.06.16. - git commit and push that
- Get a cup of coffee while Docker Hub, Argo CD, and your k8s cluster updates it.
- Enjoy your updated website!
Next steps
The next steps for me are to migrate my blog from Wordpress to Kubernetes. Luckily, Yuhui already has instructions for that! After that I’ll need to implement the finishing touches for a real website; i.e. connecting my hostname (www.TroyHernandez.com) to the appropriate IP address and logging some basic visitor statistics. When I get around to that I’ll be sure to post it!
In the meantime, feel free to visit the alpha version of my new website here.